相信大家已经或多或少的听说了HTTP/3或者QUIC,我就不在继续解释HTTP/3是什么了,反正是新一代的HTTP,并且基于UDP,不再受限于TCP三次握手四次挥手了;腾讯云的CDN也已经推出了收费的QUIC协议等等。
不过目前Nginx目前还没有正式启用HTTP/3及QUIC,倒是CloudFlare早已推出了Nginx的QUIC解决方案,LiteSpeed也已经在正式版中支持了HTTP/3。本文将带领大家在宝塔面板中在Nginx-quic[1]技术预览分支下编译Nginx。
本教程与Ubuntu 20.04版本完成,全程使用root用户,目录使用的是root的~目录,代码都保存在这里。操作前请先做好备份/快照,数据丢失及环境损坏与本教程无关
目前的Nginx QUIC解决方案
官网:https://quic.nginx.org/
由官方推出的Nginx QUIC解决方案,目前还处于技术预览,与普通Nginx相同使用BSD协议,基于最新的1.21版本,并定时从主分支拉取代码。
本文以此方案来介绍。
前置准备
首先你的宝塔Nginx需要是编译安装的1.21版本的Nginx,否则将缺少对应的依赖(/www/server/nginx/src文件夹)。如果不是的话可以卸载后重新编译安装,注意备份nginx.conf文件(/www/server/nginx/conf/nginx.conf)
然后是需要安装依赖,使用以下命令:
1 | apt install build-essential ca-certificates zlib1g-dev libpcre3 libpcre3-dev tar unzip libssl-dev wget curl git cmake ninja-build golang hgsubversion |
编译BoringSSL
Nginx的QUIC由谷歌的BoringSSL[2]提供支持,所以我们需要编译一下BoringSSL
1 | git clone --depth=1 https://github.com/google/boringssl.git |
如命令ninja运行时出现网络错误,多半是go连接服务器出问题了,可以使用以下命令解决。
1 | go env -w GOPROXY=https://goproxy.cn,direct |
其他来自官方的编译方法见:https://github.com/google/boringssl/blob/master/BUILDING.md#building
获取Nginx-quic代码并编译
获取代码
nginx的代码使用的是hg作为版本控制,和git用法很像,刚刚我们也已经安装过了。使用以下命令获取源代码:
1 | hg clone -b quic https://hg.nginx.org/nginx-quic |
获取宝塔Nginx的编译参数
运行以下命令:
1 | /www/server/nginx/sbin/nginx -V |
得到大概是以下结果:
1 | root@VM-20-6-ubuntu:~$ nginx -V |
记住configure arguments后面的参数,现在要对他进行修改。首先删除--with-openssl=...参数(否则应该是编译不上),其次修改--with-pcre=pcre-8.43为--with-pcre=/www/server/nginx/src/pcre-8.43(就是补全了路径),最后就是添加HTTP/3模块参数--with-http_v3_module --with-stream_quic_module --with-cc-opt=-I../boringssl/include --with-ld-opt='-L../boringssl/build/ssl -L../boringssl/build/crypto'(需要注意boringssl的路径是否正确)
我的最终编译参数为:
1 | --user=www --group=www --prefix=/www/server/nginx --add-module=/www/server/nginx/src/ngx_devel_kit --add-module=/www/server/nginx/src/lua_nginx_module --add-module=/www/server/nginx/src/ngx_cache_purge --add-module=/www/server/nginx/src/nginx-sticky-module --with-pcre=/www/server/nginx/src/pcre-8.43 --with-http_v2_module --with-stream --with-stream_ssl_module --with-stream_ssl_preread_module --with-http_stub_status_module --with-http_ssl_module --with-http_image_filter_module --with-http_gzip_static_module --with-http_gunzip_module --with-ipv6 --with-http_sub_module --with-http_flv_module --with-http_addition_module --with-http_realip_module --with-http_mp4_module --with-ld-opt=-Wl,-E --with-cc-opt=-Wno-error --with-ld-opt=-ljemalloc --with-http_dav_module --add-module=/www/server/nginx/src/nginx-dav-ext-module --with-http_v3_module --with-stream_quic_module --with-cc-opt=-I../boringssl/include --with-ld-opt='-L../boringssl/build/ssl -L../boringssl/build/crypto' |
编译Nginx-quic
使用以下命令来生成配置:
1 | cd nginx-quic |
后面那一大串就是刚刚拼接的字符串。
接下来删除objs/Makefile文件第三行的-Werror参数(编译中会有警告,有这个参数就会变成错误构建失败)

然后再nginx-quic目录下运行make就可以开始编译了
1 | make |
没有出错就说明编译成功了。如果编译成功的话,在~/nginx-quic/objs/目录下面应该会出现一个名为nginx的文件。
替换原本的Nginx
使用以下命令替换原本的Nginx
1 | mv /www/server/nginx/sbin/nginx{,.bak} # 备份原本的Nginx文件cp objs/nginx /www/server/nginx/sbin |
没有出错的话就是升级成功了。
配置网站的HTTP/3
修改网站配置文件
网站首先要配置了HTTPS,点开他的”配置文件“,加入以下内容:

1 | listen 443 http3 reuseport; # 代表开启HTTP/3 |
如有多个网站需要开启HTTP/3,reuseport参数只需添加到其中一个网站的配置即可(不然会报错)。
开放服务器防火墙443端口的UDP协议
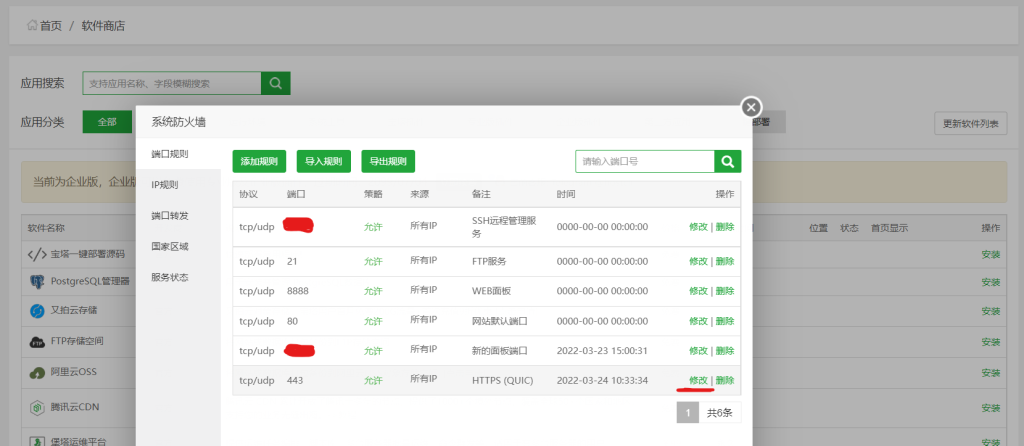
这一步是烦我最长时间的一步,宝塔的安全组默认显示443端口UDP开放,实际上并没有,需要手动修改以下。可以使用宝塔应用”系统防火墙“便捷操作。

点击上图中443端口的修改然后直接保存或删除重新添加443端口即可(协议一定要选TCP/UDP)
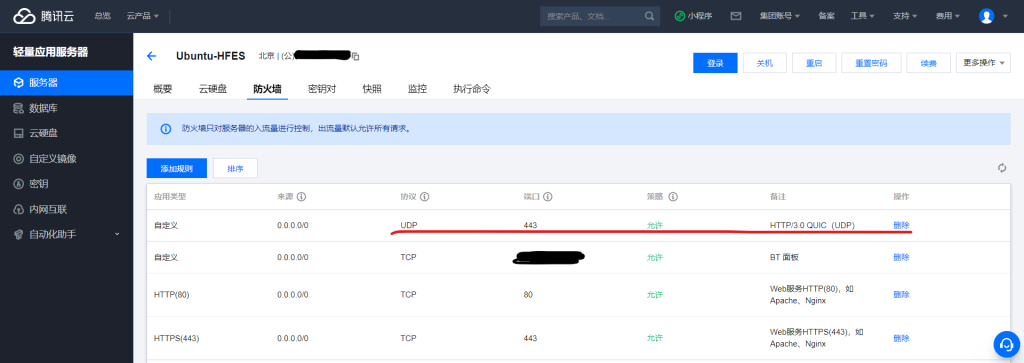
开放服务器安全组的443端口UDP协议
一般服务器提供商会有一个安全组来控制服务器的访问,在提供商那里把443端口的UDP加上就行了

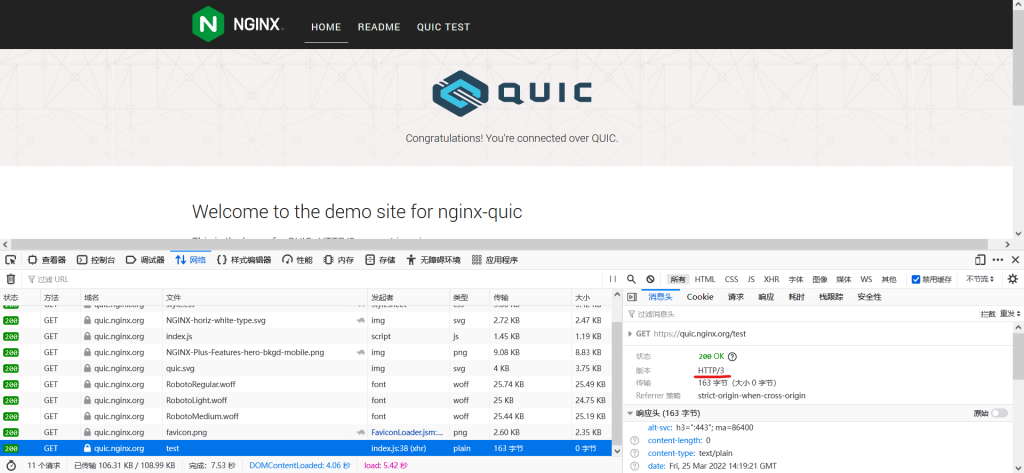
检验HTTP/3是否生效
如果你是Firefox用户,可以直接在开发者工具的网络栏看到HTTP版本:

转载自 Orangii橙梓 ,略有删改
原文链接:https://blog.orangii.cn/2022/bt-panel-enable-http3/
宝塔Nginx编译启用HTTP3/QUIC
https://blog.lingxh.com/post/bt-nginx-quic/Author
lingxh
Published at
2022-03-27
License
CC BY-NC-SA 4.0
